MybatisPlus 基础

学习 MybatisPlus 的记录

使用方法

官网:MyBatis-Plus

引入依赖

Maven 项目在 pom.sml 文件中引入依赖,Spring Boot 3版本如下,boot3 即为 2 版本

1
2
3
4
5
<dependency>
    <groupId>com.baomidou</groupId>
    <artifactId>mybatis-plus-spring-boot3-starter</artifactId>
    <version>3.5.9</version>
</dependency>

配置数据源

application.yml 文件中添加数据源配置,示例如下:

1
2
3
4
5
6
7
# DataSource Config
spring:
  datasource:
    driver-class-name: com.mysql.cj.jdbc.Driver
    url: jdbc:mysql://${MYSQL_ADDRESS:localhost}:3306/${DATABASE}?serverTimezone=Asia/Shanghai
    username: ${username}
    password: ${password}

MySQL的 url 串常使用配置:useSSL=false&serverTimezone=Asia/shanghai&useUnicode=true&characterEncoding=utf8,意为禁用 SSL,设置时区为 Asia/shanghai,使用 Unicode 字符集和 UTF-8 编码

其中 ${} 是引用环境变量,方便配置与隐藏密码,而 MYSQL_ADDRESS:localhost 则是没有该环境变量时,则使用默认值 localhost,也可使用 ${MYSQL_ADDRESS:localhost:3306},此时 localhost:3306 将被作为一个整体处理

添加 @MapperScan

完成以上配置后,在项目启动类上添加 @MapperScan 注解并指定扫描范围,MP 将在指定的包下扫描 Mapper 接口并自动创建代理对象,示例如下:

1
2
3
4
5
6
7
@SpringBootApplication  
@MapperScan("me.lhy.demo.mapper")
public class DemoApplication {
    public static void main(String[] args) {
        SpringApplication.run(DemoApplication.class, args);  
    }
}

BaseMapper

MP 提供了一个基础的泛型接口 BaseMapper<T>,为实体类提供了基础的单表 CRUD 方法。示例如下:

1
2
3
4
5
// 实体类
public class User{...}

// Mapper 层中
public interface UserMapper extends BaseMapper<User> {}

如此,便可在其他地方使用,如在测试用例中:

 1
 2
 3
 4
 5
 6
 7
 8
 9
10
11
12
@SpringBootTest  
public class UserMapperTests {  
  
    @Autowired  
    public UserMapper userMapper;  
  
    @Test  
    public void testSelect() {  
        List<User> users = userMapper.selectList(null);  
        users.forEach(System.out::println);  
    }
}

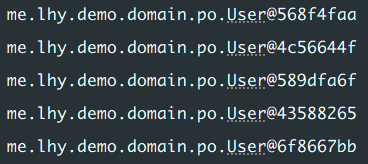
输出如下:

UserMapper-Output-1

常用注解

@TableName

用于类上,标注实体类对应的表名,通常用于实体类名表名不同时,或表所在 schema 不同

常用的参数为 valueschema

1
2
3
4
5
@TableName(
	value = "t_user",  // 标注表名
	schema = "example" // 标注 schema
)
public class User{...}

@TableId

用在成员变量上,标注实体类的主键以及主键的生成策略

常用参数有 valuetype

1
2
3
4
5
6
7
public class User{
	@TableId(  
        value = "user_id",  // 对应的列名
        type = IdType.AUTO  // 主键的生成策略
	)
	private Long id;
}

其中 IdType 有以下枚举值:

  • AUTO:数据库自增
  • NONE:无,使用全局设置
  • INPUT:插入时自己设置值
  • ASSIGN_ID:需要主键是 Long、Integer 或 String 类型,默认为雪花算法
  • ASSIGN_UUID:需要主键是 String 类型,默认使用 UUID

当不指定主键策略,没有全局配置,并且插入时 id = null,则 MP 会默认使用雪花算法生成 id

@TableField

用在成员变量上,标注对应的列,当变量名与列名不同,或变量名与数据库关键字冲突时使用。

常用参数有 valueschemaexist

常见用法如下:

1
2
3
4
5
6
7
public class User {
	@TableField(  
	    value = "`salary`",  // 避免与 MySQL 关键字冲突
	    exist = false    // 标注此变量在表中不存在
	)
	private BigDecimal salary;
}

配置文件

MybatisPlus 支持基于 yaml 文件的自定义配置,一般用于设置一些全局配置,如主键生成策略、更新策略、mapper.xml 的位置等

参考:使用配置 | MyBatis-Plus

常用功能

单表查询

使用 Mybatis-Plus 提供的 Wrapper 机制进行方便的单表查询

查询数据分页

逻辑分页:将所有数据读入内存中,然后进行分页

物理分页:使用数据库提供分页机制进行分页

使用 Mybatis 提供的 RowBounds 进行分页

以下是一个简单示例:

 1
 2
 3
 4
 5
 6
 7
 8
 9
10
// UserService
List<User> userList = userMapper.selectAll(new RowBounds(0,10));

// UserMapper
public List<User> selectAll(RowBounds rowBounds);

// UserMapper.xml
<select id="selectAll">
     select * from user where id>0
 </select>

但 RowBounds 是将所有符合条件的数据全都查询到内存中,然后在内存中对数据进行分页,若数据量极大,则容易造成内存占用过大或直接OOM。

当然,JDBC 也会做一些优化,不会一次性将所有数据加载,而是先加载一部分,后续再根据需求去请求数据库,但可能会造成频繁访问数据库,给数据库造成较大的压力。

使用分页插件

无论是常用的 Pagehelper 还是 Mybatis-Plus 自带的分页插件,都是基于 Mybatis 提供的 Interceptor 机制运行。

Interceptor 拦截需要分页的 select 语句,然后根据参数去动态地拼接 SQL,从而实现分页。

好处:提供统一的分页处理机制,分页功能完成封装后,其他人可拿来即用,无需维护或关心实现原理。

手动实现

在 xml 文件中手动编写分页 SQL,例如,使用 MySQL 提供的分页关键字 Limit 去实现分页。

Licensed under CC BY-NC-SA 4.0
最后更新于 2024-12-20 CST
使用 Hugo 构建
主题 StackJimmy 设计